Designer - Adding typed lists
Preface
As mentioned in
Concepts - Entities, lists and views, a Typed List is a list of entity fields from
a set of entities which have 1:1, 1:n or m:1 relations which each other. This means that when there are no entities added to the project, you can't create a
Typed List.
Adding a Typed List
To add a Typed List to your project you take the following steps:
-
In the Project
Explorer, right-click 'Typed Lists' and choose 'New Typed List', or you
select 'Add New Typed List' from the project menu
-
A little screen will pop up, in which you can name the Typed List. Please note
that this name has to be CLS Compliant, meaning it has to be usable as a
variable name and cannot contain special characters or spaces. Also, this name
should be unique among typed lists.
-
After clicking 'ok' the Typed List will be added to your project explorer and
the editor for the new Typed List will be opened in the
tabbed area. Now you can begin constructing the Typed List. (This
editor is also opened when you select Edit / Properties... in the context menu
that pops up when you right click a Typed List in the project explorer.)
You can also create a copy of an existing Typed List by right-clicking an existing Typed List list in the Project Explorer and then select the option Create New As Copy from the context menu.
 Note: Note:
|
|
It's not recommended to specify a name for a typed list which matches an entity's name or a typed view's name.
|
Constructing a Typed List
As with the entity editor, the Typed List editor is also divided in sub tabs. The Typed List editor has the following three sub tabs:
Entity selection, Fields mapped on entity fields and Custom properties. The sub tabs can be navigated at the bottom of the
Typed List editor tab. Besides these sub tabs, the editor allows you to alter the name of the Typed list.
Entities selection sub tab
The first sub tab is Entities selection. This is the sub tab which allows you to manage the entities in the Typed List, the aliasses used
for these entities, the relations used and the join type to use for these relations.
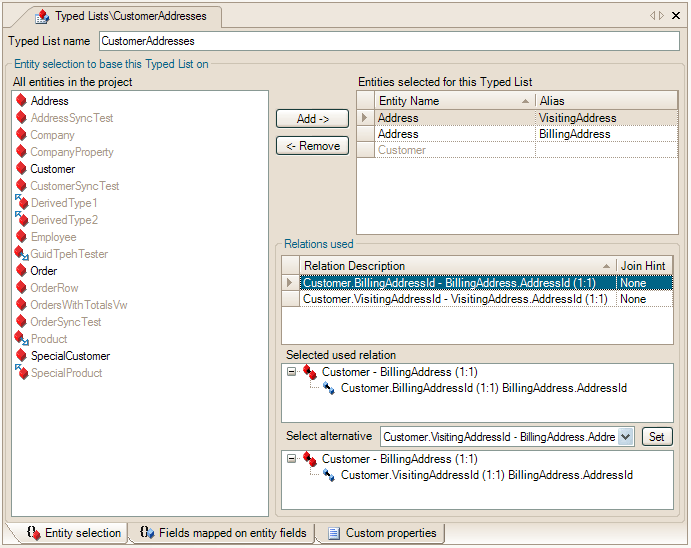
A screenshot of this sub tab of a CustomerAddresses Typed List is shown below.

Entities selection sub tab of the Typed List editor
To construct a Typed List, you start on the Entities selection sub tab. In the
upper left corner of this tab, a list of all entities in the
project is shown. Select the entity to start your list with and click
Add to add
the entity to the Typed List. It will be placed in the top right list of
entities which are currently in the Typed List, without an alias. You don't have to alias an entity if an entity is added just once to the Typed List.
In the screenshot above, Address is added twice, once for the Visiting Address and once for the Billing Address. Aliasses are specified to distinguish
them in the Typed List. You have to use these aliasses as well in filters when you're going to use the generated code. Throughout the Typed List editor,
an aliassed entity is referred to by its alias, otherwise by its normal name.
All entities in the list which have a relation with one or more of the entities
in the Typed List (1:1, m:1 or 1:n) are selectable, all other entities are
greyed out.
Normally, you first add all the entities you want to include in the Typed List. On the entities selection tab you also see the relations used to
form the Typed List. You can view a relation more in detail and also select an alternative, if there is one available. An alternative relation
is available when the current relation is removable from the Typed List in favor of the alternative and the entities in the Typed List will still
be related to each other without having one or more entities 'orphaned' from the rest: it has to be possible to navigate from one entity to another in the
Typed List over the relations in the Typed List.
To remove an entity from the Typed List, you can only select an entity which will not break a relation chain. This means
that when an entity is removed all entities left in the Typed List are still related to each other in one way or the other.
Example: Customer, Order and Employee are added
to the Typed List. Order is related to both Customer and Employee, which by themselves don't have a 1:1, 1:m or n:1 relation with each other.
Removing 'Order' would break the relation chain, because the entities left would not have a relation with each other and the Typed List can then
not be created.
 Important: Important:
|
|
Keep in mind that the order in which you add the entities to the Typed List is controlling which relations are used by the Typed List: when you add customer
first and order later, the relation will be Customer - Order (1:n). When you add order first and customer later, the relation will be
Order - Customer (m:1). This is important because Customer - Order is a weak
relation, while the relation Order - Customer (m:1) is not. This can be of influence when you want to use the weak relations support in your code. See for
more information about weak relations this section.
|
If an entity has more than one relation with another entity in the typed list, you will be able to select an alternative relation for the currently selected
relation. By clicking the set button, the then selected alternative relation is used instead of the current selected relation. To be able to specify how
the relations should be
joined in SQL, you can specify a join type per relation: None (default, results in inner join), left, right, cross or inner.
Be aware that a cross join can be performance intensive.
Fields mapped on entity fields sub tab
The second tab is the Fields mapped on entity fields sub tab. This sub tab contains the list of fields in all the entities added to the Typed List
(the All available fields list) and a list of fields selected from that fields list, which are the fields making the Typed List (the fields in Typed List list).
By default, no fields are in the Typed List, you have to select the fields you want in the Typed List from the All available fields list by checking their
checkboxes. In a way this is selecting the fields in the SELECT clause of an SQL query with a multi-table join FROM clause.
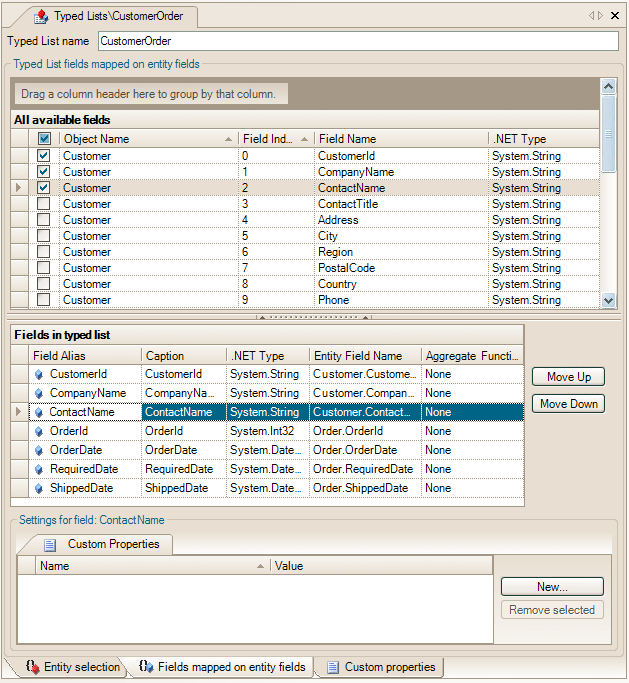
A screenshot of this sub tab of a OrderCustomer Typed List is shown below.

Fields mapped on entity fields sub tab of the Typed List editor
To add / remove a field from the Typed List, simply check / uncheck the field's checkbox in the All available fields grid.
The logic will create an alias for the field automatically using the entity field name. Normally this is enough, however if you want to alter this, you can by
selecting the field in the list and altering the name in the Alias to use textbox. The alias for a field can be specified directly in the Field Alias column
of the Fields in Typed List grid, as well as the caption column values. The caption field can be used at runtime to specify grid column header names, though you
can also use custom properties for that. Per field added to the Typed List, you can specify an aggregate function. This can be handy if you want to use a
group by collection at runtime. Group by collections aren't included in the designer to give you the flexibility to define multiple group by collections.
This sub tab furthermore contains an area to specify custom properties for the selected field.
You can add new ones, delete the existing custom properties or edit the custom properties. Custom
properties are name-value pairs (both strings) which are generated into the code in a static hashtable.
See for more information about using the custom properties
available in the generated code:
Generated code - Custom properties.
If you want to change the order of the fields in a Typed List, you can do that by selecting the field in the fields in Typed List grid and click the Move Up,
Move Down buttons. You can also click with the right mouse button in the project explorer
on the field to move up or down and then selecting the action to take (move up or down) from the context menu.
Custom properties sub tab
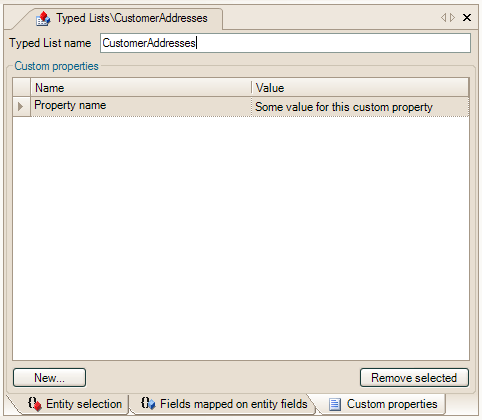
The third sub tab contains the custom property editor for the Typed List.
You can add new ones, delete the existing custom properties or edit the custom properties. Custom
properties are name-value pairs (both strings) which are generated into the code in a static hashtable. See for more information
about using the custom properties
available in the generated code:
Generated code - Custom properties.
A screenshot of the Typed List custom properties sub tab is shown below

Custom properties sub tab of the entity editor
As with the entity field editor, when you change something in your Typed List, the changes are automatically propagated to all other elements in the GUI,
showing the information changed. Also, when you have a Typed List editor open and you remove an entity which is part of a Typed List, you'll see the change
in the Typed List editor immediately.


 Note:
Note:


